crunchy chicken breast recipe

- The Best crunchy chicken breast recipe
- Crunchy Baked Chicken Breast with Garlic Sauce
- 🥘Ingredients
- 👨🍳Directions
- 🔧Equipment
- 📊Nutrition Facts (per serving)
- 📝Notes
- Watch Video Of How Crunchy Baked Chicken Breast with Garlic Sauce Works
- ❓ Frequently Asked Questions About Crunchy Baked Chicken Breast with Garlic Sauce
The Best crunchy chicken breast recipe
I’ve been making this crunchy chicken breast recipe for years, and it’s one of those dishes that just feels right—simple enough to whip up in a hurry but packed with flavor that makes it feel special. There’s something about the way the skin gets crispy and golden under the pan, then stays juicy inside, that makes it a standout protein for anyone who wants something satisfying without feeling heavy. It’s the kind of recipe that feels like a weekend project but turns into a quick weeknight meal when you’re short on time. My kids love it because it’s not too greasy, not too dry—just the right balance of crispy and tender, and honestly, they’ll eat it with almost any side, whether it’s roasted veggies, a fresh salad, or even just a simple baked potato. It’s that kind of meal that doesn’t demand extra effort but still feels like a treat.
What really makes this recipe work is how it’s built to be both a go-to daily option and something that shines at gatherings. You can serve it for a casual family dinner with leftovers for lunch the next day, or you can dress it up for a Sunday brunch with a bright citrus glaze or a sprinkle of fresh herbs. It’s lean enough to be part of a balanced diet, but the crispy skin gives it that satisfying crunch that makes it feel indulgent. My husband and I love it because it’s one of those recipes that doesn’t require marinating or hours of prep—just a few key steps, and it’s ready to impress. And honestly, the health benefits are pretty solid too. Chicken breast is a great source of lean protein, and when you cook it crispy on the outside and moist on the inside, you’re getting all the nutrients without the extra fats. Plus, it’s so versatile—you can season it however you like, whether it’s with garlic and herbs, lemon and dill, or just a simple salt and pepper. It’s that kind of recipe that makes cooking feel easy and rewarding.
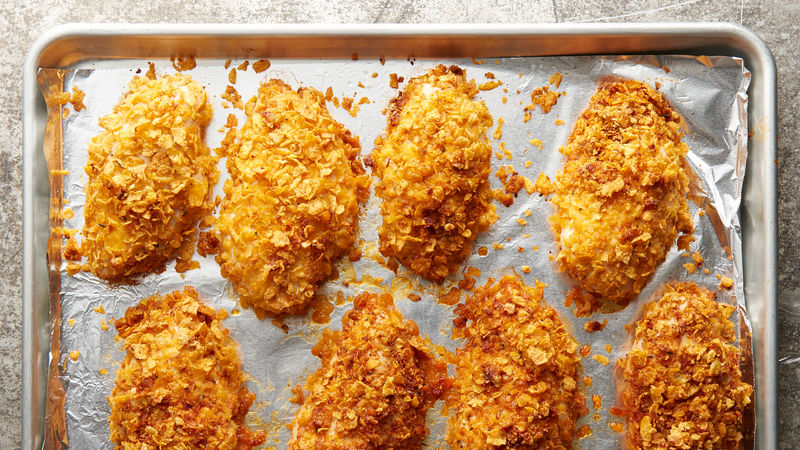
Crunchy Baked Chicken Breast with Garlic Sauce
A simple yet flavorful baked chicken breast recipe coated in a crispy breadcrumb mixture and served with a tangy garlic tomato sauce. Perfect for a quick weeknight dinner!
🥘Ingredients
- 4 boneless, skinless chicken breasts (6 oz each)
- 1/2 cup all-purpose flour
- 1/2 tsp salt
- 1/2 tsp black pepper
- 1/2 tsp paprika
- 1/4 tsp garlic powder
- 1/2 cup panko breadcrumbs
- 1/4 cup grated Parmesan cheese
- 1/4 cup chopped parsley
- 1 tbsp olive oil
- 1 cup tomato sauce
- 2 cloves garlic, minced
- 1 tbsp olive oil
- 1/2 tsp dried oregano
- Salt and pepper to taste
- 1 tbsp lemon juice
👨🍳Directions
-
1 Preheat oven to 425°F (220°C). Line a baking sheet with parchment paper.
-
2 In a shallow dish, combine flour, salt, pepper, paprika, and garlic powder. Set aside.
-
3 In another shallow dish, mix panko breadcrumbs, Parmesan cheese, parsley, and olive oil.
-
4 Pat chicken breasts dry with paper towels. Dredge each breast in the flour mixture, pressing lightly to adhere. Place in the breadcrumb mixture, coating evenly on both sides. Remove excess coating.
-
5 Place coated chicken breasts on the prepared baking sheet. Bake for 20 minutes.
-
6 In a small saucepan, heat tomato sauce, garlic, olive oil, and oregano over medium heat. Simmer for 5 minutes. Stir in lemon juice, salt, and pepper. Set aside.
-
7 After 20 minutes, increase oven temperature to 450°F (230°C) if needed, and bake for another 10-12 minutes until chicken reaches an internal temperature of 165°F (74°C) and the coating is golden and crispy.
-
8 Pour the garlic sauce over the baked chicken breasts and serve immediately.
🔧Equipment
- Mixing bowls
- Baking sheet
- Oven
- Measuring cups and spoons
- Knife and cutting board
- Food processor (optional)
- Paper towels
📊Nutrition Facts (per serving)
📝Notes
Watch Video Of How Crunchy Baked Chicken Breast with Garlic Sauce Works
This Crunchy Chicken Breast recipe is always a reliable choice for any gathering because it delivers juicy, flavorful meat with that perfect crispy texture that kids and adults alike love. Whether you’re serving it at a casual family dinner or a bigger event, it’s simple to make ahead and reheats beautifully, so you won’t be stuck scrambling last-minute. Plus, the tender, seasoned chicken pairs well with almost any side, making it a crowd-pleaser no matter what’s on the menu.
❓ Frequently Asked Questions About Crunchy Baked Chicken Breast with Garlic Sauce
1. What is the main difference between this crunchy chicken breast recipe and traditional baked or fried chicken breast?
This recipe focuses on achieving a crunchy, crispy exterior while keeping the inside moist and tender. Unlike traditional baked chicken (which often results in a softer crust) or fried chicken (which can be greasy), this method uses a combination of baking, air frying, or pan-searing with a special coating that enhances crispiness without excess oil. The key is using a dual-cooking approach—first baking to set the flavor and texture, then finishing with a crispy finish—along with a crispy coating (like crushed cornflakes, panko, or a homemade mix) and proper seasoning.
—
2. How do I achieve the best texture—crispy outside and juicy inside—without the chicken drying out?
The secret lies in proper timing, moisture control, and technique: – Bake first (low and slow): Start by baking the chicken breast at a lower temperature (325°F/160°C) for 15–20 minutes to gently cook it while allowing the coating to set. This prevents the outside from burning before the inside is fully cooked. – Rest before crisping: Let the chicken rest for 5–10 minutes after baking to redistribute juices before adding the crispy layer. This ensures the inside stays juicy. – Use a crispy coating: Mix crushed cornflakes, panko, or a blend of breadcrumbs with spices (like paprika, garlic powder, salt) and coat the chicken thoroughly before baking. Avoid overloading it to prevent sogginess. – Finish with a crispy touch: For extra crunch, broil or pan-sear the chicken for 1–2 minutes at the end (watch closely to avoid burning). Alternatively, air-fry at 375°F (190°C) for 5–7 minutes until golden and crispy. – Don’t overcook: Use a meat thermometer to check for 165°F (74°C) internal temp. If the chicken feels slightly undercooked, return it to the oven for 2–3 minutes.
—
3. Can I make this recipe ahead of time and still get the crispy texture?
Yes, but you’ll need to adjust the method slightly to maintain crispiness. Here’s how: – Prep ahead: Make the crispy coating mixture and coat the chicken breasts a day in advance. Store them in the fridge in a sealed container. – Reheat carefully: To crisp them up again, bake at 400°F (200°C) for 10–12 minutes, flipping halfway, or air-fry at 375°F (190°C) for 5–6 minutes. Avoid microwaving, as it steams the coating instead of crisping it. – Add moisture if needed: If the coating feels dry, lightly spray the chicken with water or oil before reheating. – Alternative: For a quicker option, pan-sear or air-fry fresh chicken with a fresh coating—just don’t skip the initial bake to set the seasoning.
—
4. What spices or seasonings work best for this recipe, and can I customize the flavors?
The crispy coating is the perfect canvas for bold flavors! Here are proven combos and how to customize: – Classic BBQ: Coat with crushed cornflakes + panko + smoked paprika + brown sugar + garlic powder + salt + cayenne (for heat). – Greek-style: Mix panko + crushed graham crackers + dried oregano + garlic powder + lemon zest + dried dill + black pepper. – Spicy Cajun: Use crushed cornflakes + panko + cayenne + garlic powder + onion powder + smoked paprika + a pinch of cayenne. – Honey Mustard: Blend crushed cornflakes + panko + Dijon mustard + honey + smoked salt + black pepper. Finish with a drizzle of honey-mustard glaze after crisping. – Lemon Pepper: Toss with panko + crushed crackers + lemon zest + black pepper + garlic powder + a touch of dried thyme. – Taco: Mix crushed cornflakes + panko + taco seasoning (or homemade: cumin, chili powder, oregano, lime zest).
Pro tips: – For extra flavor penetration, brush the chicken with olive oil or melted butter after baking before adding the crispy layer. – Herbs: Fresh herbs (like parsley, cilantro, or basil) can be lightly crushed into the coating or sprinkled on top after crisping. – Acidity: A squeeze of lemon/lime juice or a splash of vinegar in the coating brightens flavors (works well with honey-mustard or Greek-style).
—
5. How do I know if the chicken is cooked through without burning the coating?
The best way to ensure perfectly cooked chicken with a crispy exterior is to use a meat thermometer and follow these steps: – Internal temp check: Insert the thermometer into the thickest part of the breast (avoiding bone). The chicken is done at 165°F (74°C). – Visual cues: – The coating should be golden and crispy (not pale or raw). – The chicken should look opaque (not translucent) when sliced. – Timing hack: – Start with a lower bake (325°F/160°C) for 15–20 minutes to cook the chicken gently. – If the coating starts browning too fast, reduce oven temp by 25°F (15°C) and cover loosely with foil to slow cooking. – Resting: Always let the chicken rest for 5 minutes before slicing—this prevents juices from leaking out and keeps the texture moist. – Finish crisp: If the coating isn’t crispy enough, broil for 1–2 minutes (watch closely!) or air-fry at 375°F (190°C) for 2–3 minutes until bubbly and golden.